Twit follow

Tuesday, April 27, 2010

Technology and the Press OK

Today, printers can measure and control color better than ever before. Employing best practices should be a prerequisite for choosing your provider. Minimally your provider should be able to share with you data about the proof, plate and press sheet. Below is a visual look at what we can provide to our customers should they ask. These procedures take place on every job when possible. There are times that there may not be room on the sheet for the necessary target but these are few. Even so the fact that every job is measured has helped our shop to become better right out of the box. The end result is a shorter ok and an exceptionally satisfying experience.

The first thing you need to know is what standard does the provider measure against. At LCP we print to the GRACoL 2006 color space utilizing G7 methodology. By the way G7 is not a color standard, if that is what you have been told you have been led down a path that never ends. G7 broken down is simply using Gray, Cyan, Magenta, Yellow, Black, Red(MY Trap), Green(CY Trap) and Blue(CM Trap) to measure against the targeted color space. G is the Gray and 7 is the 7 colors CMYKRGB.

The governing body for G7 certification is the IDEAlliance. Printers need to be certified by an approved color specialist. Once this is done, recertification is a once a year process. There is a problem here, it takes work to get certified and once that is done you can say you are G7 certified. Here is the catch, it takes more work to maintain accuracy and live G7 day to day. Pressrooms are not like prairie dogs, standing still for hours on end. Pressrooms move, stocks change, roller conditions vary, environmental factors such as temperature and humidity change print conditions, and presses print differently on Mondays than they do on Wednesdays. These are simple fact of life and something that requires ruthless process control to combat. These factors are why monitoring and measuring are critical to providing a consistent product.

I hope you enjoy the stunning photography below and please if you have any questions let me know and I will be happy to explain in more detail.

Step 1 - Proof should contain a control strip.

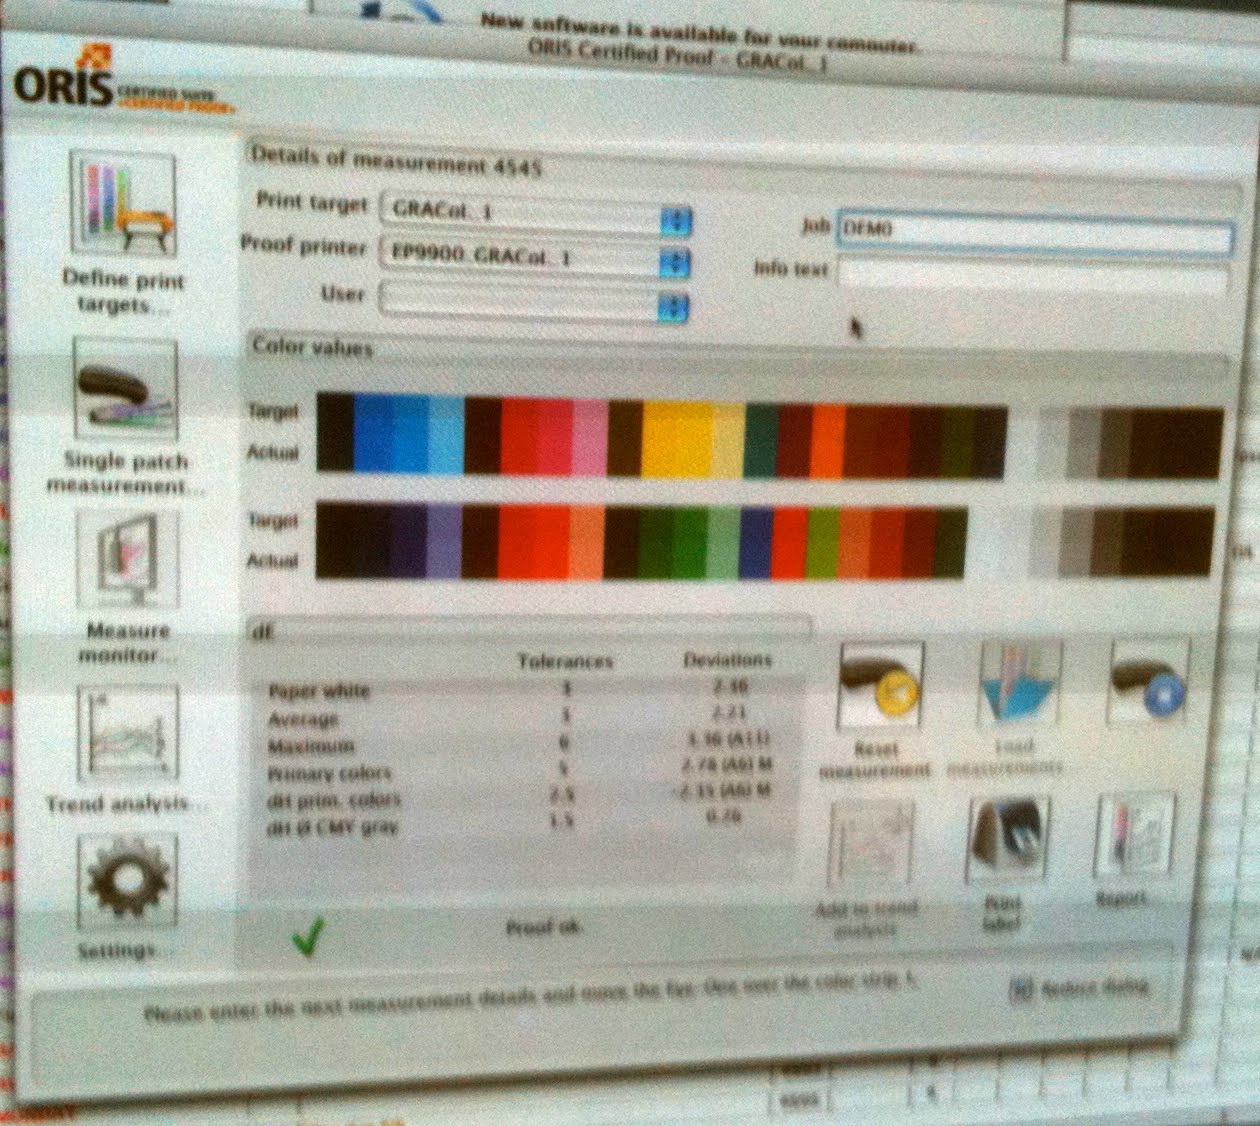
Step 2 - Read every proof into a certifying software and show proof of certification on the proof.


Step 3 - Read, Confirm and Record every plate for accuracy.

Step 4 - Add appropriate color target to press sheet.

Step 5 - Bring sheet to established house densities and read into verification software.

Step 6 - Verify readings for both Color and Gray.

Step 7 - Use information to scientifically adjust color to the best possible proof match based on current press conditions and the current stock being used.

Looks simple doesn't it? Well not really, the key is knowing what to do when any of these steps fail. It does happen but the simple fact that your provider is watching these things should give you a good feeling. At least you will know what you are OK'ing or rejecting and have a basis to make any adjustments that might be necessary.

Monday, April 26, 2010

MegaPixels to Offset Print Explained

The other day I was asked if using a 2 megapixel camera is sufficient for images in an offset printed piece. This is a loaded question and takes an understanding of the science/math behind megapixels. I’m going to attempt to illustrate this for you. Please understand that resolution is only one small part of the factors that make a photograph good. Other factors such as color, contrast, sharpness and focus play an equal if not more important role.

The viewing distance of the final piece also plays a role. The information provided here is specifically for print collateral that one would hold in their hand and read. Typically an image resolution of 300 dpi is desired for high quality image reproduction.

Here are some typical camera resolutions:
2 megapixels: 1600 x 1200 Multiplied = 1,920,000 pix or about 2 megapixels
3 megapixels: 2048 x 1536 Multiplied = 3,145,728 pix or about 3 megapixels
4 megapixels: 2274 x 1704 Multiplied = 4,362,240 pix or about 4 megapixels
5 megapixels: 2560 x 1920 Multiplied = 4,915,200 pix or about 5 megapixels
6 megapixels: 2816 x 2112 Multiplied = 5,947,392 pix or about 6 megapixels
7 megapixels: 3072 x 2304 Multiplied = 7,077,888 pix or about 7 megapixels
8 megapixels: 3264 x 2468 Multiplied = 8,055,552 pix or about 8 megapixels

Notice the 2MP camera and the 8MP camera. The first thing that should be noticed is that the 8MP camera has only twice the resolution in the Height X Width as the 2MP camera. Hmm, Did you realize that? MP’s are like the square footage of pixels. Most people think that 4MP is twice 2MP. etc. Sure it is but not when it comes to image dimensions.

So now how do these numbers relate to a 300 DPI image used in your printed piece?

To figure this out we will use a simple calculation of DPI time Inches.

Example:

5” X 300dpi = 1500pix   7” X 300dpi = 2100pix

This means that in order to produce a picture at 300 dpi, you need a camera capable of a 2100 X 1500 resolution. If we look at the information above we see that a 3MP camera gives enough pixel resolution to produce a 300dpi 5X7 image in a landscape fashion but not portrait. Turning the camera on its side when taking the shot would allow enough resolution for a portrait orientation.


These examples are based on using the whole image. This is where being a photographer is important. The framing of the shot is critical. Cropping an image will have a major effect on the size you can use it. See this example:


If you are using a 2MP camera and wanted a 4X5 crop, close to the example above, you would need to have turned the camera on its side and cropped the shot in the viewfinder. The 8MP image is sufficient with a bit of scaling.

The math is pretty simple. Basically take the size you desire and multiply it by 300 this will give you the amount of pixels needed.

Dimension X 300DPI = Amount of pixels.    For 5” you need 1500pix, For 3”, 900pix etc.

Full frame images are capable of the following output size at 300DPI
2MP = about 5.33” X 4” at 300DPI
3MP = about 6.82” X 5.12” at 300DPI
4MP = about 7.58” X 5.68 at 300DPI
5MP = about 8.58 X 6.4” at 300DPI
6MP = about 9.38 X 7.40” at 300DPI
7MP = about 10.24 X 7.68” at 300DPI
8MP = about 10.88 X 8.23” at 300DPI

I'm not a math teacher, just ask my kids, but if you have this information, you can relate it to pixels and determine if your image has sufficient resolution at the desired crop.

Hope this helps.

Wednesday, April 21, 2010

4 Color Process that WOWS!!!!!!

I wanted to share this article with you about producing an exceptionally vibrant job with the use of 4 high octane inks. TOYO manufactures an ink set called Kaleido. These 4 colors produce color significantly outside the gamut of conventional 4 color process. The rest of this article was writen by our Chief Color Technician, Gary Hampson, and should be used as a guide if you want to utilize this technology to its fullest potential. I highly recommend giving it a try and I would be happy to assist you if you decide to give it a go.

~

Are you having trouble hitting your corporate colors in CMYK? Maybe the extended color gamut of Kaleido Inks will solve this problem and save you one or two ink units on press. The yearly savings could be quite substantial and well worth finding out. Below is a comparison of conventional CMYK (green) to Kaleido (red). You can see that overall there is a substantial increase in color gamut especially in the blue hues. The greens of forests and blues of big-sky landscapes can be enhanced quite dramatically with Kaleido.


Creating the Kaleido Ink Project    |    By: Gary Hampson

For years now the printing industry has been telling designers and content providers to send only separated CMYK images. Since color management through the use of ICC Profiles has been incorporated into most workflows, this rule may no longer apply. When it comes to preparing a project to be printed with TOYO Kaleido Inks, it most certainly does not apply.

Because the pigmentation of Kaleido Inks is sufficiently different than conventional process inks, a simple substitution of inks will not give the desired results. Substituting Kaleido Inks will increase the color range or gamut, but maintaining color balance will significantly decrease any benefits. All images should be separated from RGB to CMYK using the “TOYO Kaleido coated 1.0.icc” profile.
If some images are separated to SWOP, some to GRACoL, and yet some to KALEIDO, it will be very difficult for the press operator to figure out any color balance. The chart on the last page will illustrate this. While some colors are very similar, some are quite different because of the different processes and inks used.

Images should be kept in the RGB color space right up until the time the file is processed for proofing or plating. Color managed conversions can take place seamlessly during the refining/ripping process. This is perhaps the best way to insure that all images are being separated correctly.

From a design perspective, the most troubling aspect of using Kaleido Inks may be the fact that there are no published (printed) color charts or chip books to let you know exactly what the color palette of your project will look like on press. Lake County Press does provide a proofing solution calibrated to the Kaleido color space. We can output your color palette in the early stages of design so you will know what to expect later.

When choosing your colors, avoid using separated CMYK values. While these may be the most familiar to you, they may be the least likely to reproduce as expected. It is preferable to choose your colors in either the RGB or Lab color spaces with Lab being the best.


One method of choosing colors is to use the Pantone solid coated library for your initial choices.  See Below:
Then, convert to Lab.

And finally, to process. 

Even though it is a process color now, the color mode is Lab and it will not be converted to CMYK until it is ripped.

There are, however, two notable exceptions to this preference of leaving colors in the Lab color space. These would be the color Black and any Rich Black where you want to retain 100% black with specified CMY undercolor. Also, it is best not to leave colors as Spot unless they are actually printing as a spot color. One good reason for this is the fact that many or most RIPs will not properly render spot color transparency, especially if mixed with a process color.


NEED HELP UNDERSTANDING LAB

The following illustration may help in understanding the Lab color space. Where the a and b are 0,0 respectively, the color is a neutral grey. As the b value increases, the color becomes less blue or more yellow. As the a value increases, the color becomes less green or more red. L= lightness.  The chart below is a good visual of this explanation.


Here is one more illustration to help you understand how RGB color is separated differently for different color spaces. It shows RGB colors Separated SWOP (Web Offset), GRACol (Sheetfed Offset) and Finally KALEIDO (Sheetfed Offset) .
Back to my thoughts, what Gary has put together and I have shared here is fairly complex and should be understood prior to attempting. There has been a great deal of research and development put into perfecting this process and it can not be done effectively simply by substituting ink on press. If you try, you will be very disappointed and your results will not come close to your expectations. For further information please contact me at Lake County Press, Inc. - 847-561-5639. I will be happy to assist you in your project and help you get the most out of the process!

Tuesday, April 20, 2010

Being an Environmental Steward!

 
On Thursday, April 22nd we celebrate Earth Day. The city of San Francisco was the first to recognize Earth Day in 1970. The following year, the United Nations adopted this holiday and celebrated Earth Day for the first time on the spring equinox in 1971.

Today, many companies make being “Green” a large part of their initiatives. Lake County Press, Inc. in Waukegan, IL is no exception. LCP is committed to environmental sustainability and the “Green” printing initiative thus we sought out and received Chain of Custody certification from 3 separate organizations; FSC, SFI and PEFC. Beyond that, we support the generation of clean energy in the U.S. by offsetting our annual electricity use.  We have chosen renewable wind energy. That’s the equivalent of not driving your car 545,000 Miles!

We also aspire to be a zero landfill manufacturing facility. The chart below shows our 2009 contribution by keeping waste materials out of landfills.

These are the things that LCP does to be a responsible steward to the environment. However, beyond what we do we believe it is important to recognize our clients for their contributions to the environment as well

For many years, LCP has provided print for Siemens Building Technologies (Headquartered in Buffalo Grove, IL.). About 2 years ago, Siemens began their own Green Initiatives for print collateral. Working together with LCP, Siemens transitioned 100% of their collateral that could be produced digitally to “Print-On-Demand”. The team of Marketing Professionals at Siemens in collaboration with LCP built a custom web ordering system for collateral users. Today more than 1000 site users can shop for marketing materials on an as needed basis. Materials are produced On-Demand and delivered to the users when they are needed. Siemens also chose to print this material on an FSC Certified, 100% post consumer waste, uncoated sheet.

Working together for a common goal, Siemens and LCP have been stewards of the environment and have brightened the future for the planet.

Thursday, April 15, 2010

The Cross-Media Conversation

Ok, you have an idea; lets add a pURL (personalized Uniform Resource Locator) to our direct mail piece. Everyone is excited and you start by asking your printer if they can print pURL’s. The answer comes back YES! Wow, you are really going to hit a homerun on this one.  The job is printed and mailed. You wait, and wait, and wait. Eventually the reality sinks in and you’ve struck out.

pURL’s are similar to a phone number to call for more information. Too often people utilize technology for the sake of technology. Instead of calling a phone number the recipient invokes their pURL to find out more. When the recipient hits the landing page there better be a good reason to do so. This is where it is easy to fall short of that game winning smash.

The technology of pURL’s is only but one small part of a successful campaign. Stop thinking about pURL's and start thinking Integrated Cross-Media! Here is an example of what should happen.

You design and print a beautifully produced direct mail piece. Included on the piece is an offer driving a potential lead to a personalized website. Stop, do you know the email address or mobile phone number of the recipient and have they given you permission from past dealings to email or text them offer information? If so, why not send an email or SMS notification at the time of the print production informing them to watch their mail for an important offer being delivered in the next couple of days. You now have added another touch point to the offer. Notifications can be timed as well. Maybe before the direct mail piece arrived, or maybe after, as a follow up message. A follow up could be something as simple as: Did you see our direct mail offer yet? If not, please go to johnsmith.myAwesomeCompanyName.com to see what we have created just for you!

The landing page is the most important part of the campaign. This is where you have the opportunity to obtain important information about your recipients and understand a bit more about them. ALL landing pages should include some kind of inquiry or simple questions to help qualify the lead. Questions like: Why did you visit your personalized page?, When do you plan on buying? Are you coming to the event? Also, here is an opportunity to obtain important information about your recipient for future use. Information like email addresses, mobile contact information, hobbies, future plans etc. Additionally a link for your recipient to dynamically share the offer with a friend is a good idea? Referrals are one of the best ways to obtain leads and your satisfied customers are your best salespeople. Landing pages afford you a simple way grow and qualify your lead generation.

Now that you have developed an effective landing page, you need to act on the information you obtained. Simple thank you emails are a must. If you collected personal information like hobbies, that data can be used in the target message for future campaigns. Lets say you are selling fertilizer and your recipient is interested in gardening. They would be a great target for food safe fertilizer products. If they were interested in a deep green lawn, then maybe a high nitrogen content fertilizer would be more appropriate. Building relevant data for the future is one of the most compelling reasons for these types of campaigns.


Information that is gathered can also be sent real-time to your sales group. What could possibly be better than contacting a potential customer right when they were inquiring about your product or services. They obviously had some sort of interest because they followed through on the offer. Prompt follow-up to an interest increases your success. The odds of contacting a lead if called in 5 minutes versus 30 minutes increase 100 times.  Most integrated systems can be linked real-time to your existing CRM systems. This integration is another key to your success.

The cycle goes round and round. The keys are to collect relevant data about your leads and utilize it to tailor your message to them. Each time you connect the message should get more and more relevant! This information will increase your ability to convert leads to customers. Eventually hitting that elusive game winner!


Follow JHeinzmann on Twitter

Monday, April 12, 2010

Lake County Press, Inc. Scores Win with GMI Packaging Printing Process Control Certification


On Thursday April 8th, Lake County Press, Inc. Waukegan, IL., participated in a print certification trial conducted by Graphic Measures International, LTD. (GMI) (Wayzata, MN).

GMI has been contracted to qualify print suppliers for the in store packaging arm of a Minneapolis bases retail organization. The objectives of the program are to provide the organization with a listing of qualified vendors while:

  • Improving Consistency of Brand Packaging
  • Improving Timing and Shipping 
  • Management of Process
  • Continuous Quality Improvement 
  • Actively Involve Vendors and Suppliers


GMI evaluated all phases of the production process including Prepress, Plating, Commercial Print and Bindery. These four categories were then measured against five criteria: Documentation, Maintenance, Operator Capability, Performance, and Training.  In a conversation with LCP plant manager, Dan Murphy, it was stated, "It's not just the equipment that makes a great company, It's the people behind the scenes that make it an excellent organization". Furthermore, the auditor stated he has never had a company do as well as LCP did on the print test.

The day culminated with LCP receiving FULL CERTIFICATION. For more information please contact your LCP Sales Representative.